 |
|||||||
 |
|||||||
Weiland 8210WIN High-Flow Water Pump
Most Aurora owners know the fear of overheating your engine, and watch the temp gauge constantly on a hot day in traffic. One key is managing the flow rate of coolant with a good pump and a flow-balancing thermostat. Owner of Aurora Mark II #117 wanted to replace a leaking Ford water pump with a new, not rebuilt pump. This Weiand High-Flow pump had three bolts around the water passages versus two for the Ford rebuilt pump, giving you better leak protection.
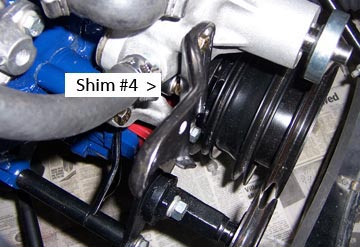
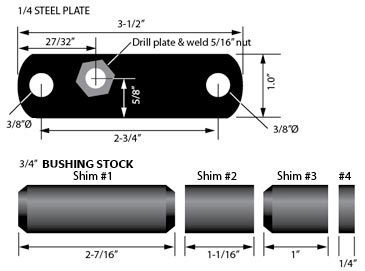
Adapting the assorted mounting brackets to this pump meant fabricating some bolt shims, and a small adapter plate to align the top bolt on the forward air conditioner bracket with a threaded bolt hole on the new pump. The bushings were made from ¾” 'bushing' stock which comes predrilled with a 5/16” hole. This bushing stock can be obtained from a welding shop. Note that bushings #1 and #3 are beveled where the end meets the pump to better fit the cast surface.
It's recommended to drill the end holes in the adapter plate before drilling the middle hole.Trial fit the pump, adapter plate and compressor bracket, mark and center punch the bracket where you will drill the 5/16" hole. Trial fit again for alignment before welding the 5/16” nut on the back of the adapter plate. This should assure perfect alignment at final assembly.
You will need to purchase some new bolts to mount the pump. When you dry mount the pump, take some depth measurements for your new bolts, taking particular care to check the maximum depth for the bolt length so they won’t bottom out. Hardened bolts are easy to get at most auto or tractor supply outlets. When finally mounting the Weiland pumpo, be sure to use a dependable gasket sealing compound, such as Quicksilver Perfect Sealing Compound #92-34227-1.
Alternator and A/C Compressor Bracket Assembly Sequence:
Top Alternator Bracket
Front, top bracket
2nd, air conditioner compressor belt idler bracket
3rd, ¼” spacerBottom Alternator Bracket
Front, Alternator adjustment arm
2nd, air conditioner compressor belt idler bracketAir Conditioner Compressor
Top bushing – 1 1/16”
Bottom bushing 1” with bevel towards pump housing.
Center – long bushingNow get out there and stop looking at the temp gauge!
You'll need to fabricate a few parts:
ˆ

![]()